Create a snow effect with gesso paint that is SO realistic for all your winter cards!
Before I share my easy steps to create a snow effect with gesso paint that you will want to RUN into your craft space to try out, I want to share a little news.
If you saw my previous post, you know that Rubbernecker is changing its name to Brass & Bliss Craft Co. The ONLY things that will change are the name, where you can interact with the same lovely people and more new goodies from the same creative geniuses that have been keeping us in stamps, dies, ink, stencils, paper and more for so many wonderful years. Their amazing customer service, packed-to-the-rafters booth at live shows and gorgeous designs of all their products will remain the same.
As one of their design team members and one of their Associate Designers, I use their products exclusively (at least, the ones they make and sell) and over the next weeks am going to be sharing your favorite projects I’ve created using items that will be sold through the new company. This way you can see what is still available if you didn’t grab it the first time and continue to be inspired by all the fun ways we can use their goodies.
Today, I am sharing one of the techniques so many of you loved – creating a snow effect with gesso pain that is super easy and adds a realistic look of glistening snow to any elements on your handmade winter cards. I love creating snowy scenes and have many cards using all kinds of pretty snowy looks. I use different techniques depending on the style of the elements I am using. Brass & Bliss’ Three Trees die set calls out for the beautiful snow effect with gesso paint you can create so easily on these beautiful, lush evergreens.
I created the snow banks with Brass & Bliss’ Deckle Hills dies, added in some sprigs with their Greenery #1 , added one of my signature red birds with their Cardinals die, used their Splatter Background to add more snow to the sky and made my sentiment with their Small Tags die and a stamp from their Winter Wonderland set. ALL of these items will be available in the Brass & Bliss Craft Co store when it goes live in March.
Below I share the step by step details for each element and share my little tip to make that built up snow sparkle just like in real life.

Card Base, Falling Snow and Snow Banks
- Cut an A2 sized card base using light blue cardstock.
- Secure the card and Splatter Background stamp in the MISTI and stamp using white pigment ink.
- Apply white embossing powder to the card and heat using a heat tool.
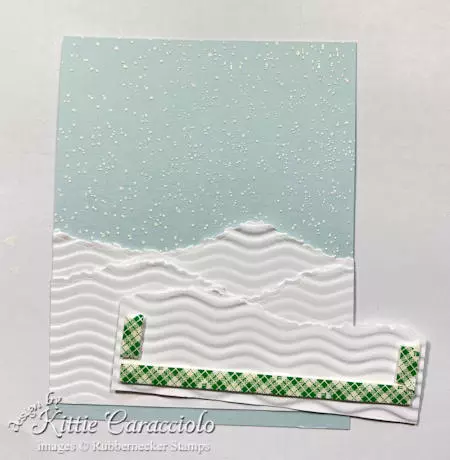
- Cut three white 4.25″ wide Deckle Hills sections and run them through a wave crimper.
- Attach two of the snow layers directly to the card base using double stick tape.
- Apply strips of mounting tape to the back of the third snow layer and attach it to the card base. Pro Tip: Make sure to offset the snow layer borders for a natural looking landscape.
Flock the Trees With That Snow Effect With Gesso Paint
- Use green cardstock to cut the Three Trees. I cut one full set of trees and two extra of the middle sized tree.
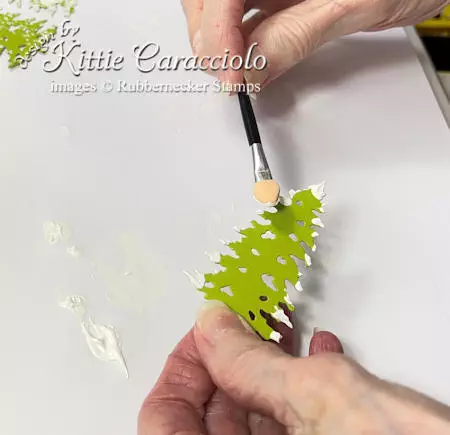
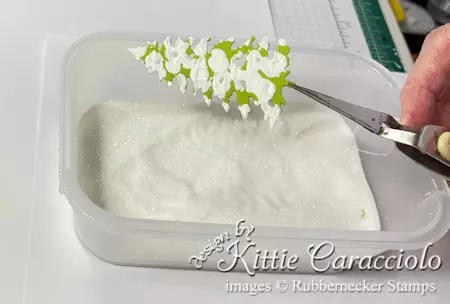
- Apply a blob of white Gesso on your work surface and begin applying it to the edges of the trees using a mini applicator.

- Apply touches of the Gesso to the tree to create the appearance of snow but allowing some of the green to show through.
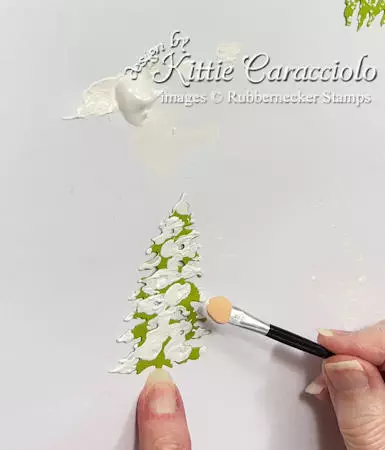
- Continue adding the Gesso to build up and create the appearance of billows on the branches. Adding this medium in these little touches rather than “painting” it on helps to create a very natural look.
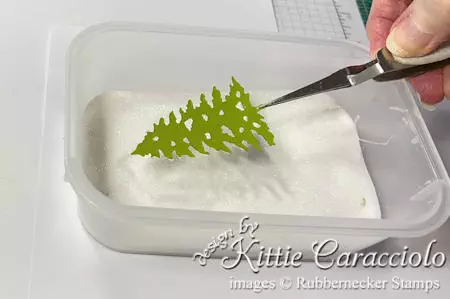
- And now the step so many people skip – add that gorgeous sparkle by dipping the trees in clear glitter, pushing down gently for the glitter to attach to the Gesso. Set aside to dry thoroughly so you don’t disturb any of your snow. Pro Tip: Use a pair of tweezers to hold the trees by their trunks so you can keep your fingers out of your wet paint.
- Use green cardstock to cut a few branches from the Greenery #1 set, dip the tips in Gesso, sprinkle with clear glitter and set aside to dry.
Finish the Snow Scene Card
- Cut a tag from the Small Tags set using white cardstock.
- Secure the tag and Winter Wonderland sentiment in the Misti and stamp using Shady Lane ink.
- Use red cardstock to cut one Cardinal, color the beak using a black marker.
- Apply pieces of mounting tape to the back of the trees.
- Tuck the trees in behind the snow layers and attach them to the card base.
- Tuck the greenery springs in behind the snow layer and attach using glossy accents.
- Finish by attach the cardinal to the tree using a piece of mounting tape.

Maybe it’s because I live in Florida – I just LOVE making all kinds of snow! Here’s what you will want to grab if you want to make this card (NOTE: until the Brass & Bliss Craft Co store goes live in March, you will be able to purchase items through the Rubbernecker store):
|


And then for all the items I use all the time you can see my everyday crafting tools here.
As you can see, creating that beautiful snow effect with gesso paint is super easy and applying it in those little dabs really makes a difference, as does that addition of the sparkle that makes a snowy day so magical. Try this technique out on any snow scene card you make and let me know what you think!